Homemade
Torso #1 Homemade
Torso #1
By
Dave Painter
And
they said it couldn't be done...
Before
I begin, let me say that this was a lot of work. Let me also state
that that's exactly why I decided to do this project, It's big,
complicated, and possibly the most fun I've ever had building anything.
It is very important to have all of your measurements figured out
before you start. I spent a almost a year (on & off) working
on a set of drawings before I started .
Step
1
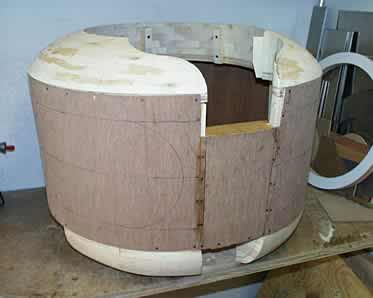
The torso consists of two rings and a center conical tube. I realize
that there is quite a lot more to it than that, but essentially
that's it.I began by choosing the materials. I chose to make the
rings from pine. Since I began I've discovered several high density
foams that are available from plastics stores which may have proved
easier, but heck, You can buy pine at Home Depot.
Step 2
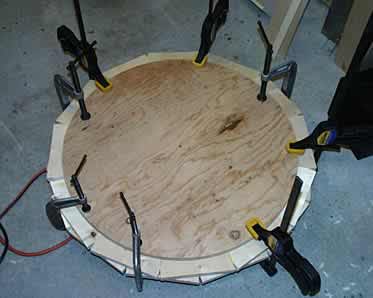
I cut the pine into trapezoids that fit together to form a ring
of sufficient diameter and laminated them together using wood glue.
I made the stacks several thickness' high. This technique is the
same one you'd use if you were making a turned wooden bowl. Now,
since we are building this torso ourselves, and we are not forking
out the mega-bucks for a pre-fab, we are entitled to spend a little
bit of cash for some tools to make the project easier. Not to mention
the fact that ANY excuse to buy power tools is a GOOD one. I bought
a 10" bandsaw and a 4 1/2" grinder.
Step 3
Using the bandsaw and the pine layup, I trimmed both rings into
the proper round shapes. Then I made a jig using a 12" lazy
susan and some plywood, fastened the layup to the lazy susan, placed
the whole thing on the bandsaw table and trimmed the edges from
the pine. Note that each ring was made using this same technique.

Step 4
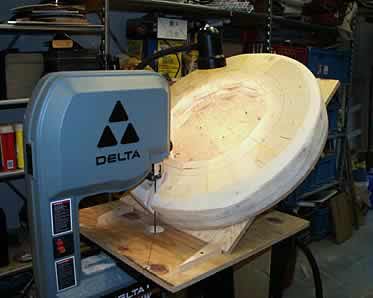
Next, I made a template with the correct curve for the upper ring
from some masonite. With the trimmed pine still mounted to the lazy
susan, I began shaping the ring. This was a very noisy process.
I used a 36 grit pad and was able to shape the upper ring in about
4 hours.
Step
5
Some of the shaping was done while spinning the ring, but I'd say
that the majority was done just working a section at a time, checking
the shape with the template and moving on.

Step 6
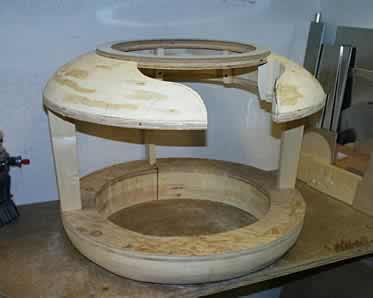
When the rings were complete I marked the opening In the upper ring
and cut out the interior and the opening for the neons.
Step 7
The rings were spaced using some pine spacers which were glued and
screwed to the rings.
Step 8
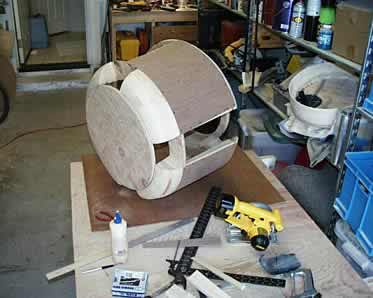
Now apply the skin to the outside of the rings in order to form
the body. I chose a 1/8" Lauan Door skin material (also available
at Depot) and discovered some interesting things. First, the door
skin is actually just a very thin plywood. It's very inexpensive
but it's not without certain problems. First of all it bends better
in one direction than the other. Secondly when you cut a piece using
a jigsaw, it tears the heck out of one side. My advice to you is
to experiment with it a little bit and don't get too discouraged.
I got it to work and you can too.
Step
9
You can't simply cut rectangular pieces and expect them to fit around
the rings. I found it necessary to cut each piece with a slight
arc. When these were cut, I attached them using glue and nails.
Note also that I had to cut a 1/8 " recess into the bottom
of each ring so that the skin would fit flush with the edge of the
rings (refer to the illustration). I used a router, mounted into
a router table to do this.
Step 10
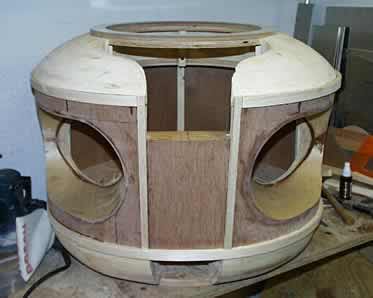
When the skin was on, I marked the arm sockets and cut them out
using the jig saw.
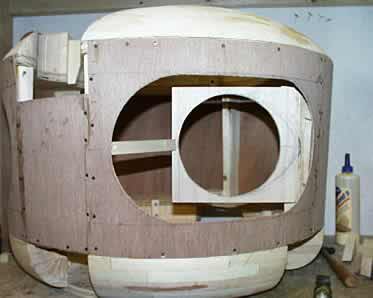
Step 11
The opening in the rear of the arm socket was made using some 3/8"
scrap plywood.
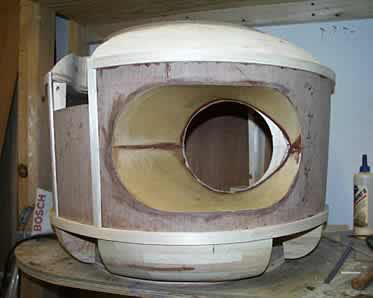
Step 12
The skin in the arm sockets was made from some very thin plywood
(1/32") which I purchased at a local hobby shop that specializes
in model aircraft. To cut the proper shapes, I used some manilla
folders to make templates. I transfered the shapes to the plywood,
cut the pieces and then using some thick cyanoacrylate glue, I glued
them into place. When they were in, I reinforced the installation
using some epoxy.
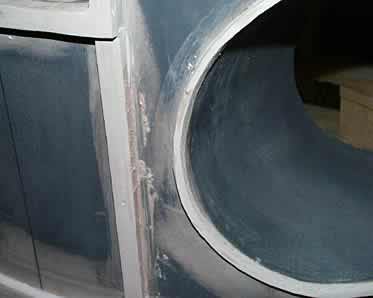
The
torso looks like a torso but I noticed that the skin pulled in slightly
towards the inner vertical braces. I used Auto body filler (Bondo)
to fill the imperfections.
Step 13
The trim was made using Bondo too. I initially tried using balsa
wood (refer to the photo in step 12), but that proved to be too
difficult since the trim has to attach to some very curved surfaces.
I also tried using foam tape, but it proved to be too soft and nothing
I tried to stiffen it up seemed to work. The Foam tape did prove
to be the best method for creating little mini forms for creating
the trim.
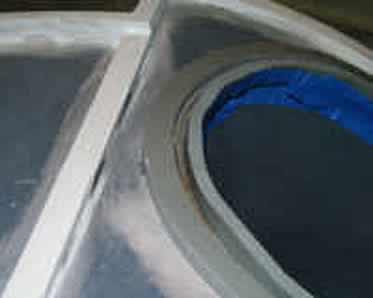
You
may have noticed that the opening for the neons looked a little
bit too wide at the top (refer to previous photos of un-primered
torso). When reviewing the drawings I noticed that I had made an
error on a dimension. I fixed the drawing and then, using Bondo,
I fixed my torso. This photo shows the corrected position.
Also
note that the opening is still NOT correct in these photos. The
corrected opening can be seen on the next page. At the time (Summer
98') I hadn't made the tracing of the "real"torso opening.
The
Bondo Trim Technique
The process of building the trim pieces is the same throughout the
torso. I took a few shots of the trim around the arm socket.
Using the foam tape, build a channel of appropriate size.
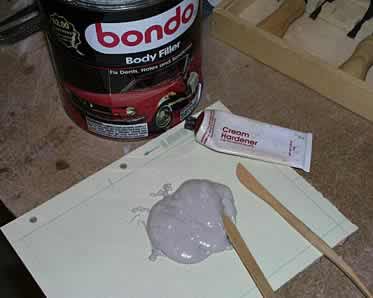
Mix a small quantity of Bondo
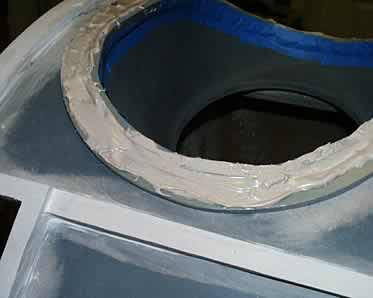
Fill the channel

Remove the foam
Cut off the excess

Do it again, until the finished product looks like this!
Step
14

Well there it is.
It's not perfect, but the flaws aren't too obvious. My original
intent was to make a fiberglass copy of this, but since I have absolutely
no intention of going into the torso building business, I decided
to abandon that idea.
|