 |
|


| Robot Reference->Construction Tips->Radar Construction #1 | |||
By Steve T. The
following is a description of how I made my Radar Section. While
it mat not be the BEST way to do it, it should at least provide
a good starting point.
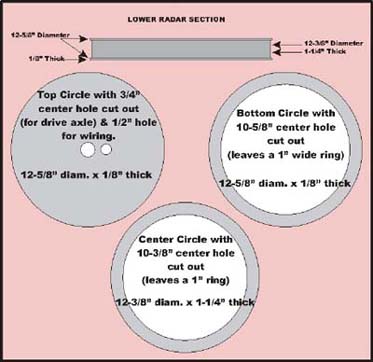
The Lower Section is made up of 2 (two) 1/8" thick circles mounted on the top & bottom of a center ring that is 1-1/4" thick. See illustration below. This can be constructed from wood, acrylic (plexiglass) or a combination of both. I made mine using both wood & acrylic. Materials List
Building
the Upper Radar Section The center holes are for the PVC end cap to slip through & mount to the lower section. You will insert a 1-1/2" PVC pipe into the end cap support the bubble. Since there is very little margin for error & circles are very difficult to cut, you may want to pay a couple of extra bucks to the plastics company to cut these for you. If you do this, make sure they mark the "dead center" of each so you can cut out the 2-1/4" center holes (unless they do that for you as well.) Cutting out the center holes in each is fairly simple to do with a hole saw that attaches to your drill. You can buy these at any hardware store in a kit for that come with several different diameter blades. Make sure you buy your 1-1/2" PVC & PVC end cap first before cutting out the center holes! The actual size of the end cap can vary depending upon the manufacturer and you want to make sure it fits in the opening. You can make the hole larger if needed to accommodate the end cap, as the size of this is not crucial. Just make sure the center hole is large enough for the cap to fit inside easily. Now that you have the 10 circles, make sure the cut edges are smooth, remove the paper backing (if you used acrylic), then stack & glue them alternately, starting with a smaller circle at the bottom, then a large circle, then small, etc. until they are all glued together. **Save the one that you marked the fin placements on for the last one (leave the paper on the top of this if it is marked). Use a small amount of Plumbers GOOP to glue them together. The center holes are useful in making sure they are properly aligned. Make sure you don't get any GOOP too close to the edges! You don't want it to seep out when you press them together! Clamping the rings together isn't necessary, just press them firmly together, making sure they stay in alignment. Cutting
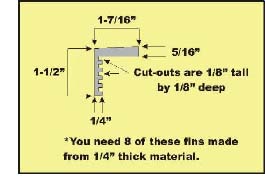
the "Fins" First, cut out the basic outline, and then cut out the 5 notches as shown in the diagram to the right. Mark a vertical line at a 1/8" depth then mark out the cut-outs for the notches. These are tricky little cuts, so take your time. I found a 1/8" thick grinding wheel that I attached to my drill (set the drill on a very slow speed). I clamped the piece to my workbench and carefully cut them out. The hardest one was the one at the top because of it being near the top edge that over hangs, but it was still fairly easy. An alternate method for this would be to cut out 1/4" wide notches in the ring section and slide the fins (with no notches in them) into the notches in the rings. The outcome is basically the same & may prove to be easier to do. Once you have all 8 pieces cut out (make sure there is no wood grain showing if you used wood), put them aside until you complete the lower section of the Radar. The final piece is the center ring that goes in the middle between the fins. It is 4-1/2" in diameter, 3/8" tall and approximately 1/8" thick. Many people have used large, plastic cups and cut this ring from that. I made mine out of a solid piece of 3/8" thick wood and cut out a center hole for the PVC only. Once the bubble lifter is in place, you have to be pretty tall and really looking to see that it isn't a ring but actually a disk. I just glued it in place with GOOP and it worked out fine. Building
the Lower Radar Section
I used the 1/2" plywood for this (it actually measured 5/8" thick, so measure yours before you buy!). I glued 2 pieces together using wood glue and clamped them together to set overnight. You may be able to find wood or other material that is 1-1/4" thick, so look around. I cut out the outside first (12-3/8" diameter) very carefully using a jigsaw. If the saw tried to waver off course, I let it only go to the outside of my line so I could sand it down to the right shape when I was done. Then I cut out the inside to leave a 1" wide ring. The width of the ring isn't critical & it doesn't have to be a perfect circle on the inside cut, just make sure it's wide enough to give proper support. If you use wood for this, brush on some fiberglass resin on the outer edge and sand it smooth. Glue the 3 pieces together using GOOP and let dry. Again, clamping isn't necessary. Putting
It All Together Put a small dab of GOOP on the very bottom of the each fin and another at the top part that rests on top of the stack of rings only. This will hold them more than securely enough once the GOOP sets. All that's left is to install the bottom PVC end cap in the center. You need to drill out holes in it to match the holes in the top ring of the Lower Radar Section for the drive shaft & wiring. It can then be mounted in place. I drilled out 3 small holes and used small nuts & bolts to secure it in addition to GOOP. The GOOP itself is probably strong enough to hold it securely, but since this is what will support the bubble and brain assembly, why take chances! Now it only needs to be primed & painted! Make sure you don't get any primer into the PVC end cap as these are generally tight fitting and you may need to remove the PVC pipe at some point! I sanded the ends of the PVC pipe so they slid in & out more easily.
|
|||
 Radar
Construction #1
Radar
Construction #1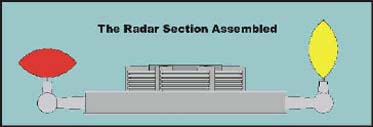
 There
is a template included in this guide for the fins, but the measurements
are easy enough to duplicate to make your own. You will need 8 fins
made from 1/4" material. Again, I used acrylic, but any material
will do. If you used wood for these, it's a good idea to coat them
with fiberglass resin and finish-sand them before attaching them
to the ring section. You don't want any wood grain to show! This
applies to all parts that you make! Sanding them is usually much
easier before they are assembled.
There
is a template included in this guide for the fins, but the measurements
are easy enough to duplicate to make your own. You will need 8 fins
made from 1/4" material. Again, I used acrylic, but any material
will do. If you used wood for these, it's a good idea to coat them
with fiberglass resin and finish-sand them before attaching them
to the ring section. You don't want any wood grain to show! This
applies to all parts that you make! Sanding them is usually much
easier before they are assembled.