 |
|


| Robot Reference->Construction Tips->Brain Construction | |||
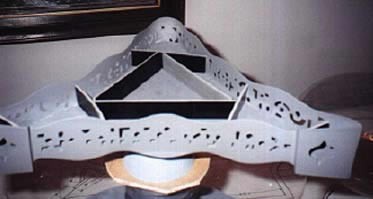
By Steve Tanner This is a fairly easy piece to make. The only "hard" part is cutting out all of the funny little shapes. This is only hard because it's time-consuming. Even the gluing was a pleasant surprise. Materials: Tools: My home-made Brain consists of 8 pieces:
With an Exacto knife, cut out all the little shapes in the wrap-around panel, the front panel and the "eye" pieces of your Xerox copies. These will be your templates. I'm going to skip over the boring details of making the top & bottom panels except to say that you should clamp these 2 pieces together before you cut them out to ensure they are the same exact size & shape. I used 1/4" hard board for mine, but in retrospect, I should have used 1/4" or even 1/8" plastic sheets for these. The hardboard had to be coated it with fiberglass resin for a smooth finish. Also, I later changed the top panel to a 1/8" thick ABS plastic because 1/4" seemed too thick and it was tough to keep from blocking the many little holes & not stick out over the top. The
Wrap-Around, Front & Eye Panels Remove the templates and cut out the panels along the outside lines. They should be fairly easy to cut with a sharp pair of scissors. Take your time. I used a pair of snips made for trimming bonsai trees. Once you have these cut out, you will need to cut out all of the little strange shapes with the Exacto knife. Place the styrene on a hard surface and carefully cut out the shapes. This is the time consuming part of the project. DON'T RUSH IT! Start by pressing very lightly with the blade tip along the outline, barely making a scratch. Trace over this outline, gradually sinking the blade deeper until you have cut all the way through. I did mine while watching TV on 3 consecutive nights, so I didn't get burned out on it & start rushing it along. The shapes that are perfectly round are very tempting to drill out. However, styrene isn't very forgiving with a regular wood drill bit of more than 1/16" wide. It tends to rip as the bit starts to take hold. (Trust me on thisÖI ruined my first attempt with a drill!) I didn't try any different types of bits (like masonry bits) and it might even be better to hot glue the styrene to a piece of wood to keep it in place and held down securely while drilling. Definitely a low speed & light pressure should work best. A better method, since small, round holes are very difficult to cut with an Exacto knife, is to use a hole punch. Some of the circles are larger than the standard 14" punch and they are also beyond the reach of the punch head. I was fortunate that where I worked, we had a punch that resembled a drill press with interchangeable punch heads. Most local commercial printing companies (and even copy shops) have this type of drill. They may, however shy away from using it on plastic. However, I used ours with no dulling of the bits at all. Styrene is a pretty soft plastic. Cut out the front panel, wrap-around panel and the 2 eye pieces in the same way. Once these are completed, you will attach the wrap-around piece to the bottom panel. Dave's drawings show the center line & where the wrqap around pieces meet the top & bottom panels. Mark the center line of the wrap-around panel and the center of the rear point of the bottom panel so you can line them up properly. MAKE SURE YOU HAVE THE WRAP-AROUND & FRONT PANEL RIGHT SIDE UP SO ALL OF THE LITTLE HOLES ARE WHERE THEY ARE SUPPOSED TO BE! Draw a line straight across the inside of the wrap-around piece. Make the line run the entire length of the piece, so it will serve as a guide to make sure the bottom panel is level. The way I did this is as follows: I laid down the wrap-around piece with the side that will be on the inside facing up. Using a straight edge, draw a line that is just below the lowest of the funny-shaped cut-outs. You don't want the bottom panel to block any of these openings! Use this line to make sure you have the correct position when you glue the wrap-around to the bottom panel. **When applying the GOOP, try not to get it all over the place & wipe off any excess. It can be a problem later when you're finishing & painting. I later thought that it may have been easier to use contact cement for this. Apply the contact cement to each surface until tacky, then join the surfaces. It will be strong and won't need to be taped to hold it together because there's no real "drying time". You could try this method and reinforce the seam on the inside with a bead of GOOP later. I haven't tried this, but it should work. I started gluing the wrap-around at the center of the back (where you marked the lines). I put a bead of Plumber's GOOP all the way around the back point of the bottom panel, running about 1" along the length of the side on each side. I placed the wrap-around against the bottom panel and held it in place for about 5 minutes. When it seemed it was OK to let go, I carefully applied some masking tape to hold it in place, being careful not to move it. Once
it's fairly secure, start applying GOOP all the way around to the
front of the bottom panel. Press the wrap-around in place, securing
it as you go with masking tape. Keep checking your alignment
against the line you drew on the inside of the wrap-around. Once the entire wrap-around is in place, allow the GOOP to set (at least a few hours) before moving on. Now you're ready to mount the front panel. Pretty straight forward. Draw a line on the back (or inside) as you did for the wrap-around for alignment. Now, GOOP it in place. Now, you should see what's next. Yup, glue the "eye" pieces in place. For the little gaps between the front panel and the "eyes", cut two little strips of styrene plastic and glue them into the gaps. All of the seams between the pieces can be filled with a little Bondo or Bondo Spot & Glazing Putty. Probably best would be plumber's epoxy putty because it adheres to plastic very well. I learned of this material from B9 Club & R2-D2 Club member, Vince Roberts, unfortunately after most of my parts were completed. It's very strong, sticks to just about anything and is easily sanded & shaped. (Thanks, Vince!) On the underside of the bottom plate, you may opt (as I did) to fill the joint where the wrap-around panels attach to the plate. I did this with a little Bondo Glazing Putty, applied with my fingertip. Apply just enough to get it into the cracks since it won't stick well to the flat surfaces. Plumbers epoxy putty should do this job better, too. Other types of caulks (like sandable & paintable silicone caulk) may work well, but I have not tried them. The top panel just sits inside the wrapped panels on top of either small wooden blocks or (like mine) on top of the little light dividers. Gravity is all that's needed to hold it in place. Lightly
sand, prime & paint, then stand back and marvel at the great
job you've done! Total cost is about $12 and about 20 hours
of time. |
|||
 Brain
Construction
Brain
Construction